Introducing and a Deep Dive Into AICR with vCluster

Jun 12, 2026
|
min Read
GPU clusters are powerful, but getting the software stack right is rarely simple. Drivers, CUDA, NCCL, kernels, Kubernetes versions, GPU operators, and container runtimes all need to line up. When they do not, training jobs fail, debugging gets messy, and teams lose time chasing compatibility issues.
AI Cluster Runtime, NVIDIA’s open source runtime for AI clusters, takes a more practical approach. Instead of relying on a static compatibility matrix, AICR helps generate and validate the right configuration from the cluster you actually have.
In this guide, we introduce AI Cluster Runtime, explain the core pieces it is built from, and then walk through a hands-on deep dive using AICR with vCluster on a private A100 node. You will see how to resolve recipes, validate conformance against live hardware, and understand how AICR can simplify GPU cluster setup.
A GPU platform is a stack of versioned layers that all have opinions about each other: serving engine, the GPU driver and CUDA toolkit, NCCL, the GPU Operator and Network Operator, the OS kernel, the Kubernetes release, the container runtime. Multiply the valid versions of each by the hardware you support and you land on hundreds of combinations. Each one is a row that has to be correct.
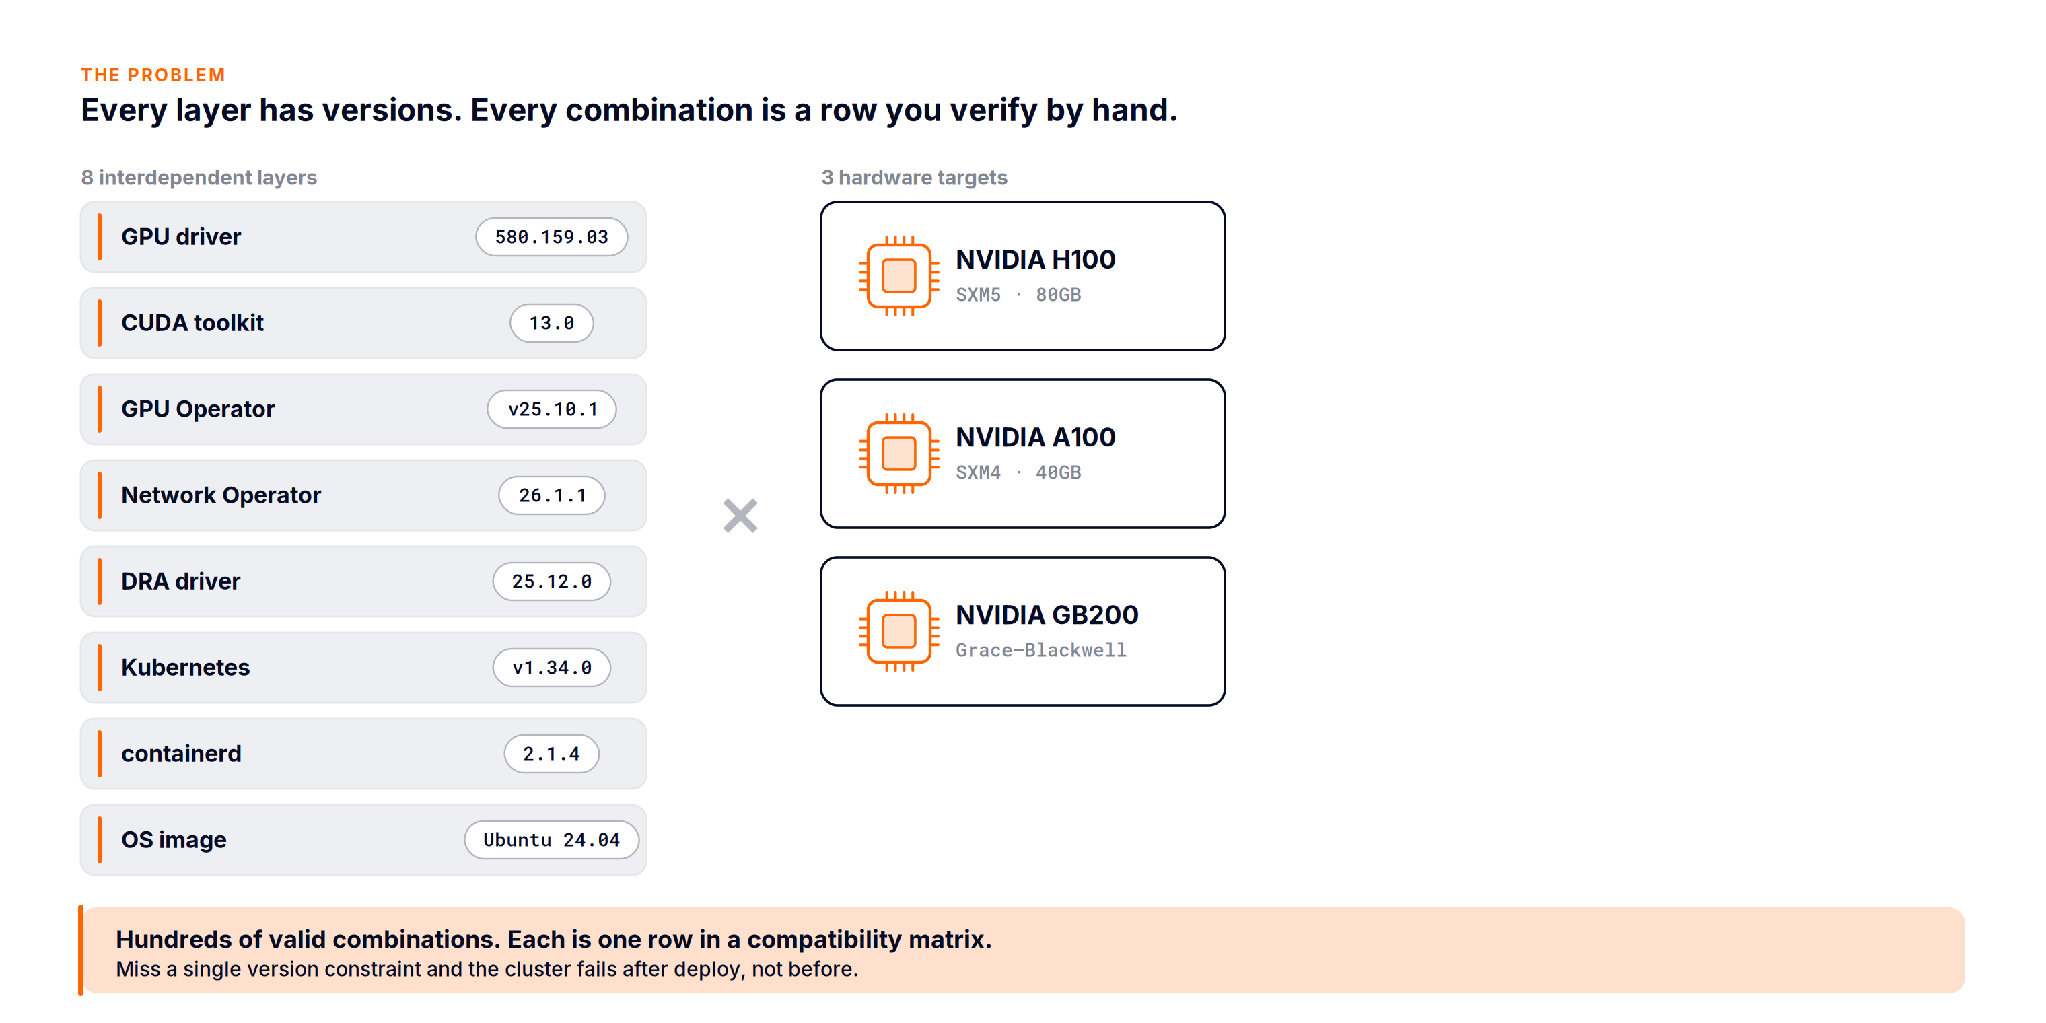
The matrix is not wrong because people are careless. It is wrong because it is static and the cluster is not. Drivers get patched, a new node type arrives, an operator bumps a minor version, and the document quietly drifts from reality.
AICR is a runtime and a CLI (aicr, talking to an aicrd API server, written in Go) that treats cluster configuration the way a package manager treats dependencies. You describe what you want, it resolves the versions that actually fit, and it can prove the result against the live cluster.
What it is not:
A useful mental model is a package manager. The snapshot is your lockfile, a record of exactly what is present. The recipe is the resolved dependency graph. The bundle is the install script that applies it.
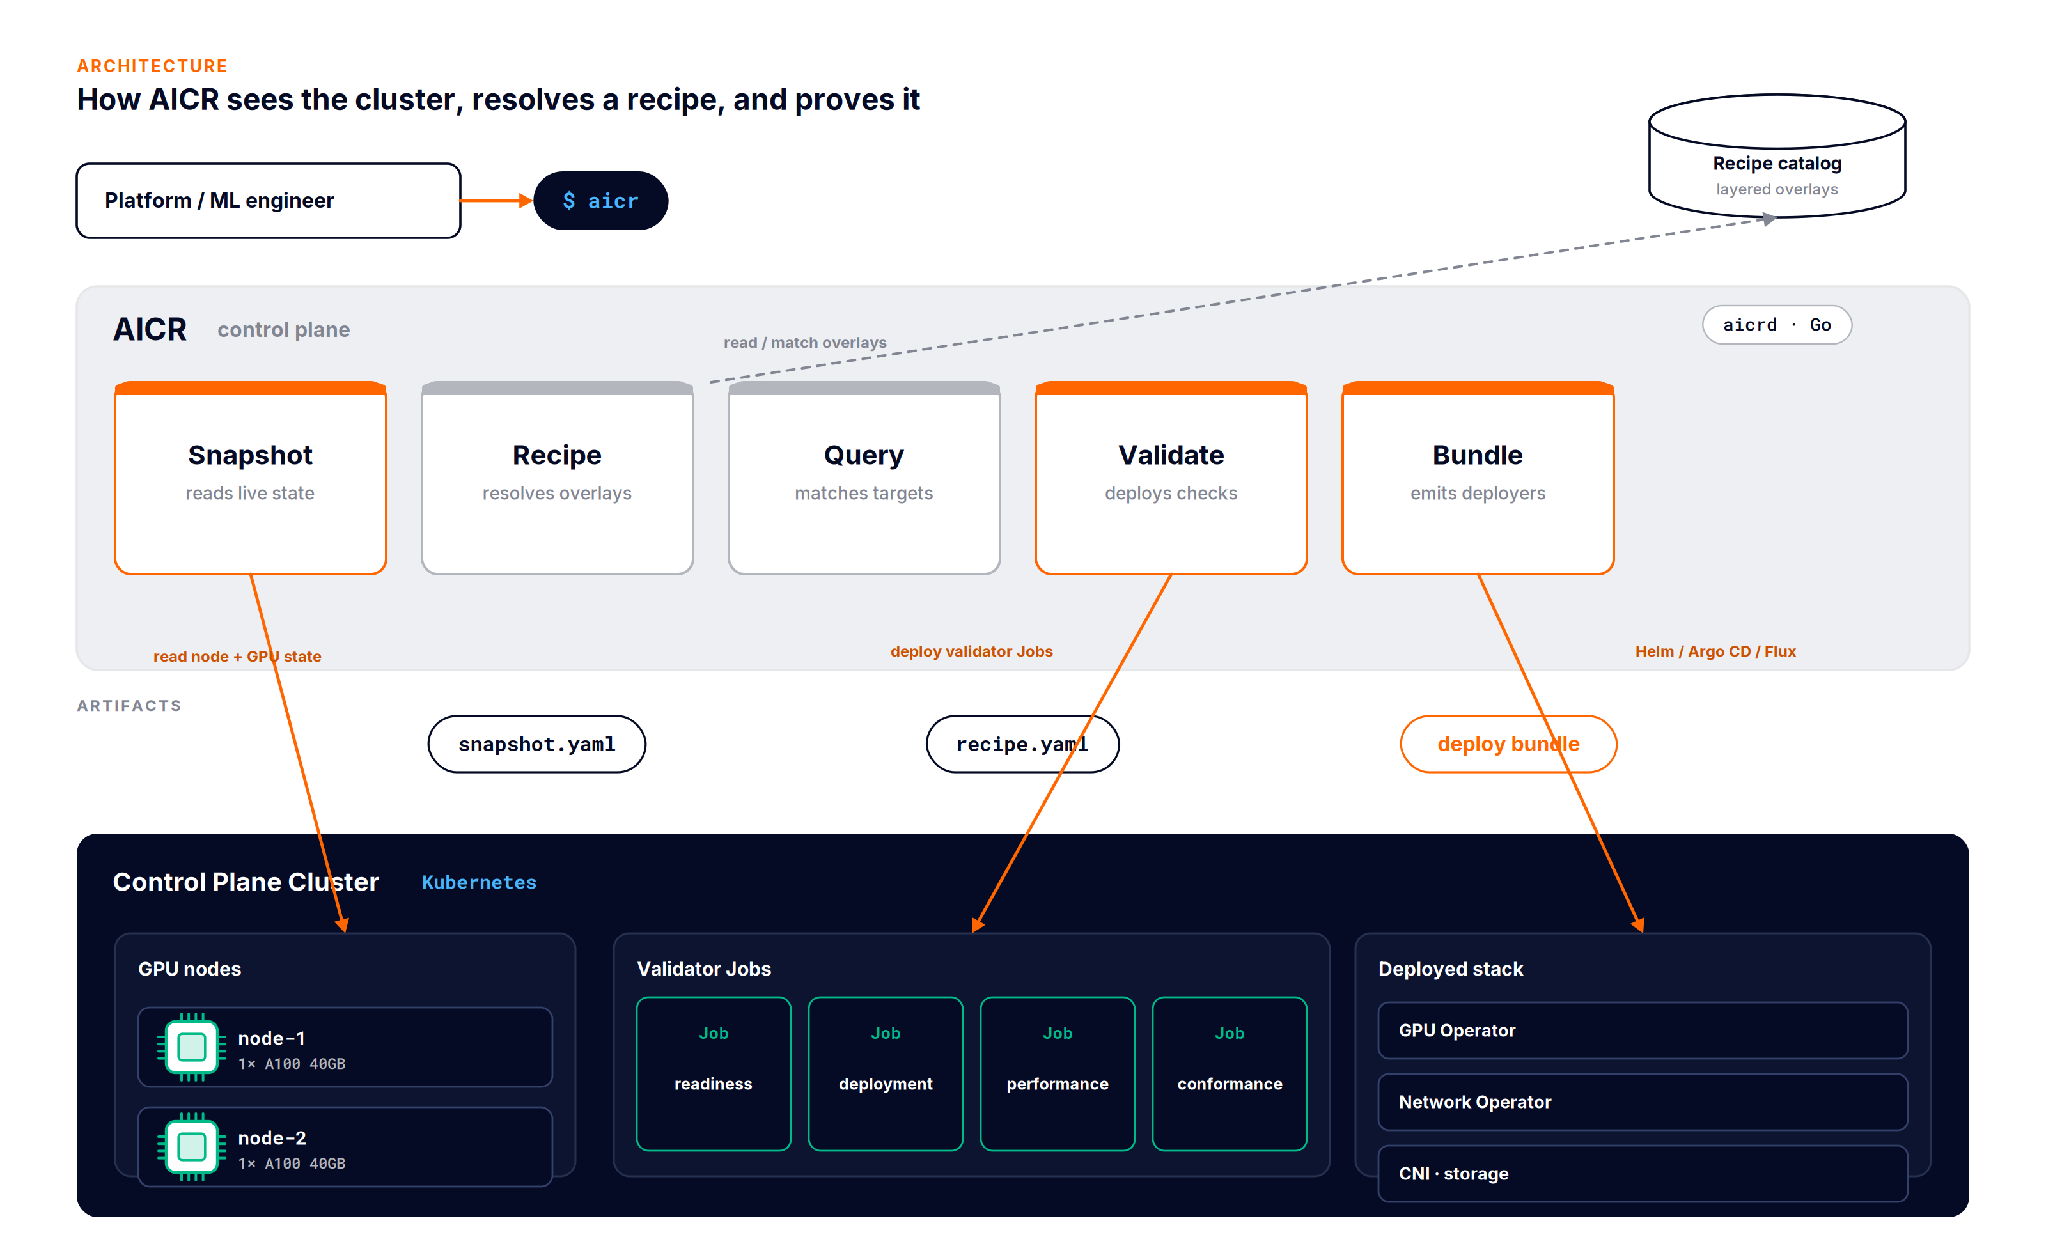
AICR is built from four moves that chain into one loop.
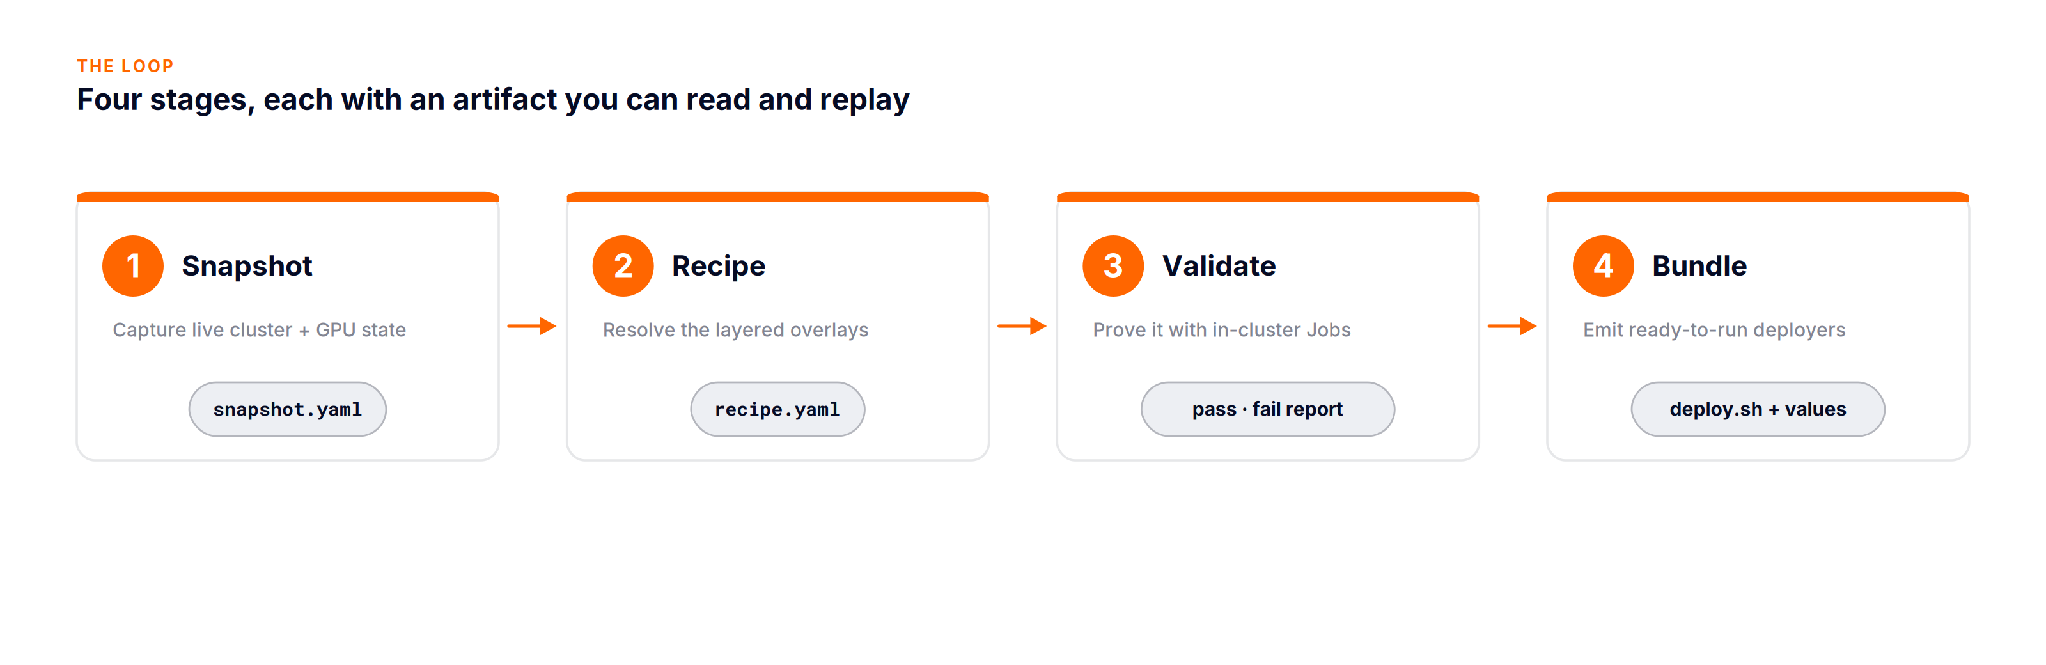
aicr snapshot reads the live cluster: nodes, GPU models, driver and toolkit versions, installed operators, and writes them to snapshot.yaml. This is the ground truth the rest of the loop resolves against, not an assumption about what the cluster should contain.
aicr recipe resolves a recipe from layered overlays: a base, then cloud, accelerator, OS, and workload layers stacked on top. Later layers win, so an H100 overlay can override a default that the base set. Matching is asymmetric: a specific query for H100 on AWS matches the H100 and AWS overlays plus any wildcard layers, while a query for any never pulls hardware specific recipes.
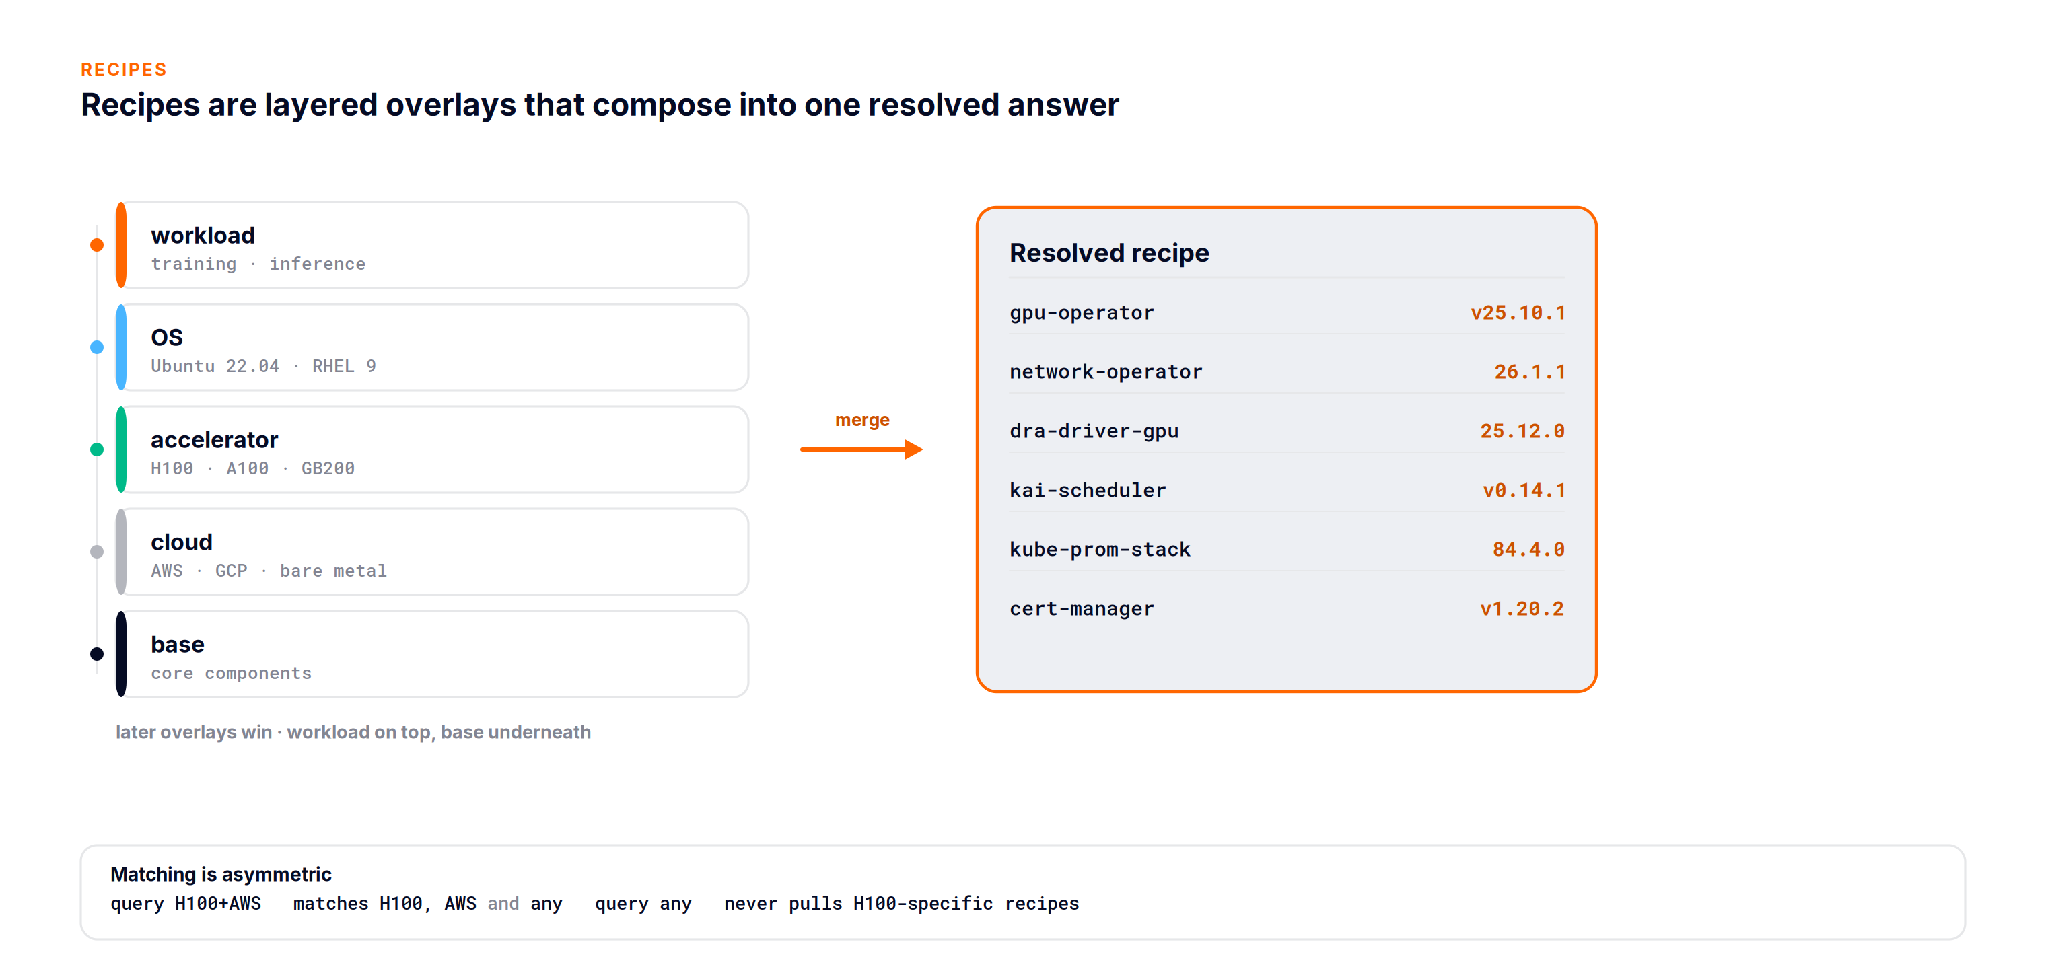
NVIDIA ships tuned recipes for hardware like H100 and GB200. On an A100 like in the below demo, the resolver falls back to the any overlay, which is the honest behavior: you get a working baseline rather than a tuned profile written for different silicon.
aicr validate is where AICR earns trust. It does not lint YAML. It deploys real workloads into the cluster as Kubernetes Jobs and checks them in phases.
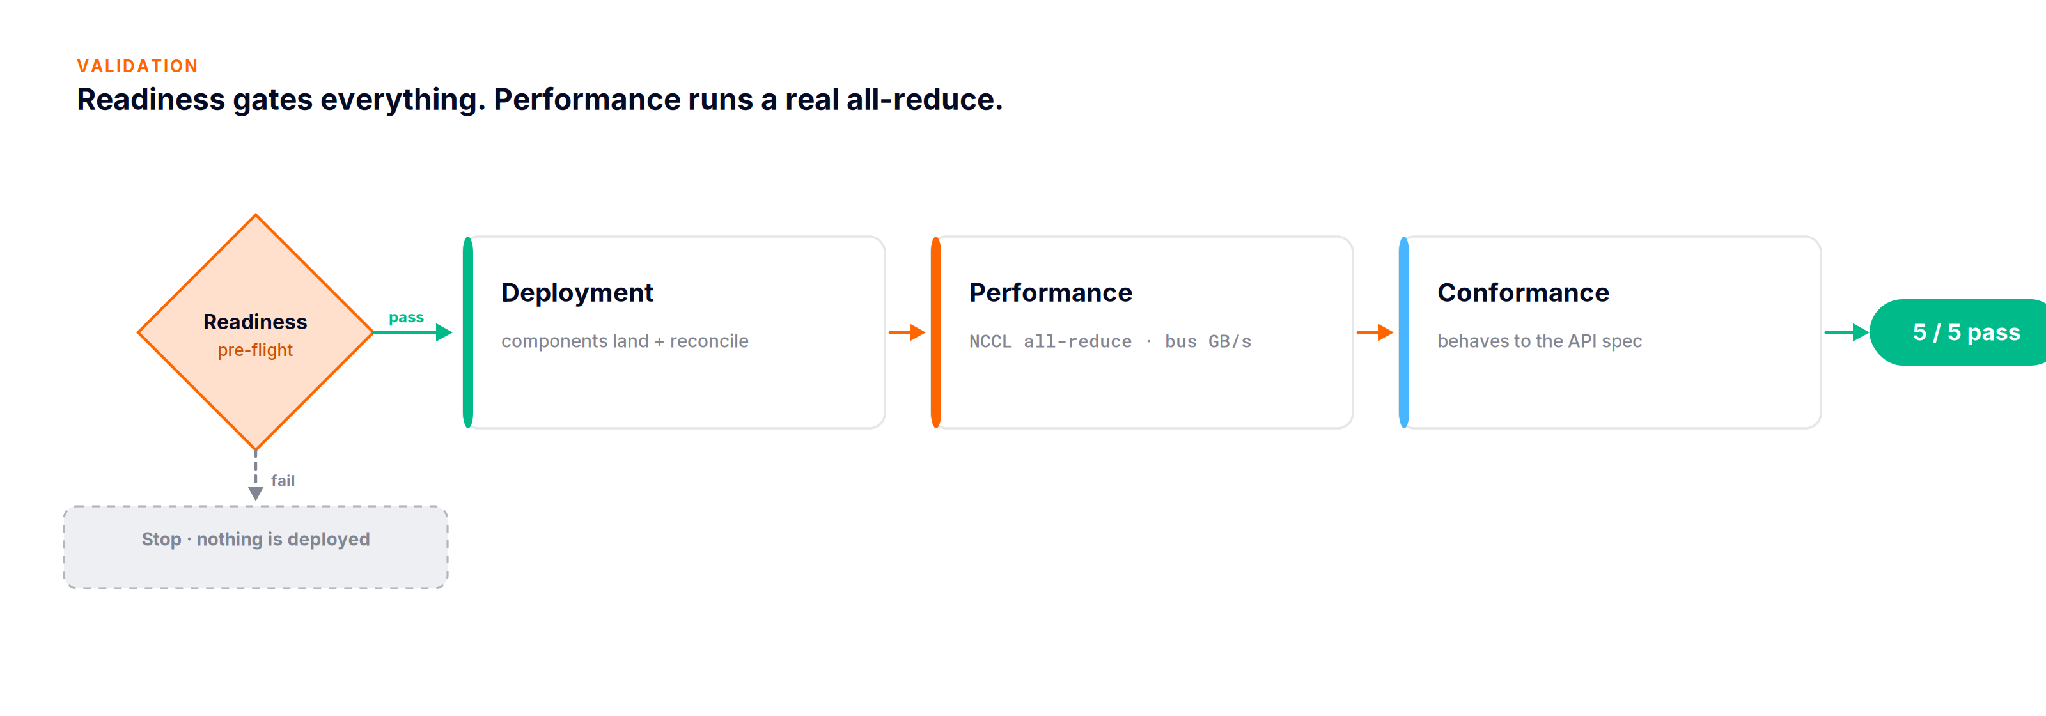
The readiness pre flight runs first and gates everything: if it fails, no validator Jobs are deployed at all. Then deployment checks confirm components land and reconcile, performance can run an NCCL all reduce as a Kubeflow TrainJob and measure aggregate bus bandwidth, and conformance checks that the cluster behaves to the API spec. The output is a pass or fail report, per check and will give you confidence on the scope of the tasks and the parameters you care for in that task!
aicr bundle turns the resolved recipe into something you can apply. It emits deployers for your tool of choice: Helm by default, plus Argo CD, Argo CD with Helm, Flux, and Helmfile. Bundlers run in parallel, so wall clock time is bounded by the slowest one, not the sum.
The goal is to help reach a state which helps you get the most of your GPUs!
In this part of the article, we will put AICR to work on a real GPU. We will stand up a small cluster on a laptop, join a remote A100 to it, resolve a recipe for that hardware, deploy it, and then prove that it works. It may sound like a lot, but each step is short, and AICR does most of the heavy lifting for you.
The first step is to install AICR. You can do this with Homebrew, or with the install script. Either one works, so pick whichever you prefer:
# install with Homebrew
$ brew tap NVIDIA/aicr && brew install aicr

# or with the install script
$ curl -sfL https://raw.githubusercontent.com/NVIDIA/aicr/main/install | bashOnce AICR is installed, the next step is to create a cluster to work in. For this we use vind, which stands for vCluster in Docker. vind runs a real Kubernetes control plane inside a container on your laptop, the same way that kind does. The difference is that vind can also join remote nodes over a VPN, and that is what lets us attach the A100. Because the GPU node joins over an encrypted tunnel, the GPU box never needs a public address. You can reference the vCluster.yaml used here.
Find the multi-node-cluster.yaml in the repo or here:
  experimental:
    docker:
       nodes:
        - name: worker-1
        - name: worker-2
        - name: worker-3

  controlPlane:
    distro:
      k8s:
        version: "v1.34.0"

  privateNodes:
    enabled: true

    vpn:
      enabled: true

      nodeToNode:
        enabled: true
Create the control plane in Docker with the following command:
# stand up a tenant control plane in Docker
$ sudo vcluster create aicr -f multi-node-cluster.yaml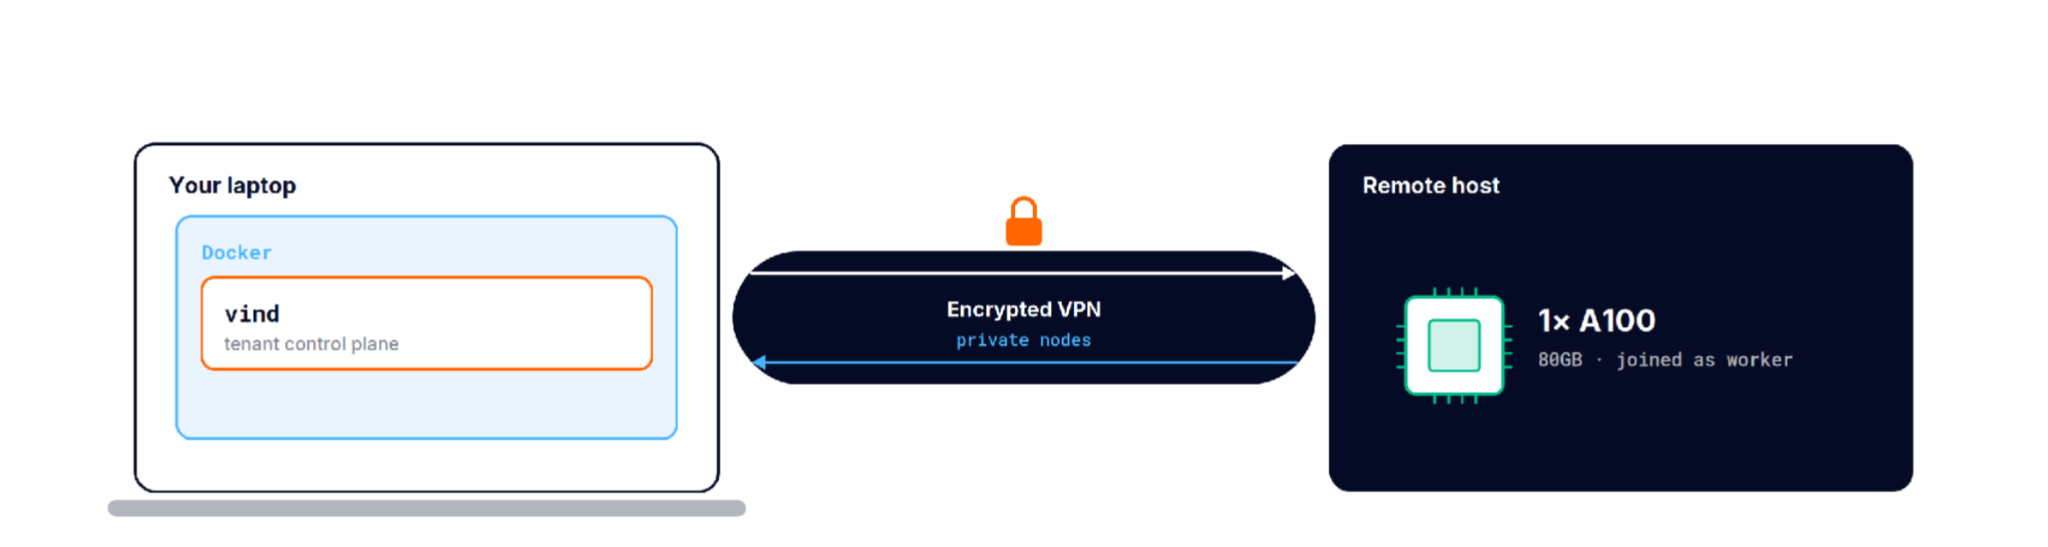
Next, mint a join token with`vcluster token create`! The generated command connects the external VM to the local cluster through the vCluster VPN, so the remote A100 becomes a Kubernetes worker node even though it is running outside your laptop’s Docker network. For a full walkthrough of joining a GCP instance as an external node, see External Nodes: Joining a GCP Instance to Your Local vind Cluster:
# mint a join token, then run the printed script on the A100 host
$ vcluster token create
join script written · run it on the GPU node to registerNow that the control plane is running and the A100 has joined, you can check what you have. The setup is three local workers on the laptop and one remote GCP node that carries the GPU.
First, confirm the control plane is running:
# the vind control plane (a tenant cluster), running in Docker
$ vcluster list
  NAME | STATUS  | CONNECTED | AGE
  aicr | running | True      | 42m
Then list the nodes:
# five nodes: local control plane and workers, plus a remote A100
$ kubectl get nodes -o wide
NAME                       STATUS  ROLES                VERSION  KERNEL
aicr                       Ready   control-plane,master v1.34.0  6.12.54-linuxkit
worker-1                   Ready   <none>               v1.34.0  6.12.54-linuxkit
worker-2                   Ready   <none>               v1.34.0  6.12.54-linuxkit
worker-3                   Ready   <none>               v1.34.0  6.12.54-linuxkit
instance-20260602-102458   Ready   <none>               v1.34.0  6.17.0-1016-gcp
The three nodes with the linuxkit kernel are the local Docker nodes. The node with the -gcp kernel is the remote A100.
On that GCP host, the GPU is real. If you run nvidia-smi on the node itself, you can see the A100 sitting idle and ready:
$ nvidia-smi
NVIDIA-SMI 580.159.03    Driver 580.159.03    CUDA 13.0
GPU  Name                    Pwr: Usage/Cap   Memory-Usage     Util
0    NVIDIA A100-SXM4-40GB    47W / 400W       0MiB / 40960MiB  0%
No running processes found
No running processes found
With the cluster ready, the next step is to resolve a recipe. A recipe is the set of components and versions that fit your hardware. Instead of looking these up in a matrix by hand, you ask AICR to work them out for you.
We run aicr recipe with two flags. AICR reads the cluster and detects the service and the accelerator as any, and our flags override those values with the kind (drop in replacement for vind) profile and a100. It then resolves twelve components across three overlays:
# resolve a recipe for the A100, kind service profile
$ aicr recipe --service kind --accelerator a100 -o recipe.yaml
[cli] flag override: service      detected=any -> kind
[cli] flag override: accelerator  detected=any -> a100
[cli] building recipe from criteria(service=kind, accelerator=a100)
[cli] recipe generation completed: components=12 overlays=3
The output is a RecipeResult file. It records the criteria you asked for, applies three overlays (base, monitoring-hpa, and kind), pins an exact version for every component, and lists the conformance checks to run later:
$ cat recipe.yaml
apiVersion: aicr.nvidia.com/v1alpha1
componentRefs:
  - chart: cert-manager
    name: cert-manager
    namespace: cert-manager
    source: https://charts.jetstack.io
    type: Helm
    valuesFile: components/cert-manager/values.yaml
    version: v1.20.2
  - chart: gpu-operator
    dependencyRefs:
      - nfd
      - cert-manager
      - kube-prometheus-stack
    manifestFiles:
      - components/gpu-operator/manifests/dcgm-exporter.yaml
    name: gpu-operator
    namespace: gpu-operator
    overrides:
      dcgm:
        enabled: false
      dcgmExporter:
        affinity:
          nodeAffinity:
            requiredDuringSchedulingIgnoredDuringExecution:
              nodeSelectorTerms:
                - matchExpressions:
                    - key: node-role.kubernetes.io/control-plane
                      operator: DoesNotExist
        config:
          create: false
          name: ""
      devicePlugin:
        affinity:
          nodeAffinity:
            requiredDuringSchedulingIgnoredDuringExecution:
              nodeSelectorTerms:
                - matchExpressions:
                    - key: node-role.kubernetes.io/control-plane
                      operator: DoesNotExist
        env: []
      driver:
        enabled: false
        rdma:
          enabled: false
      gdrcopy:
        enabled: false
      gfd:
        affinity:
          nodeAffinity:
            requiredDuringSchedulingIgnoredDuringExecution:
              nodeSelectorTerms:
                - matchExpressions:
                    - key: node-role.kubernetes.io/control-plane
                      operator: DoesNotExist
      migManager:
        enabled: false
      operator:
        resources:
          limits:
            cpu: 500m
            memory: 500Mi
          requests:
            cpu: 100m
            memory: 200Mi
      toolkit:
        enabled: false
      validator:
        affinity:
          nodeAffinity:
            requiredDuringSchedulingIgnoredDuringExecution:
              nodeSelectorTerms:
                - matchExpressions:
                    - key: node-role.kubernetes.io/control-plane
                      operator: DoesNotExist
    source: https://helm.ngc.nvidia.com/nvidia
    type: Helm
    valuesFile: components/gpu-operator/values.yaml
    version: v25.10.1
  - chart: k8s-ephemeral-storage-metrics
    dependencyRefs:
      - kube-prometheus-stack
    name: k8s-ephemeral-storage-metrics
    namespace: monitoring
    source: https://jmcgrath207.github.io/k8s-ephemeral-storage-metrics/chart
    type: Helm
    valuesFile: components/k8s-ephemeral-storage-metrics/values.yaml
    version: 1.19.2
  - chart: kai-scheduler
    dependencyRefs:
      - gpu-operator
    name: kai-scheduler
    namespace: kai-scheduler
    source: oci://ghcr.io/kai-scheduler/kai-scheduler
    type: Helm
    valuesFile: components/kai-scheduler/values.yaml
    version: v0.14.1
  - chart: kube-prometheus-stack
    dependencyRefs:
      - prometheus-operator-crds
    name: kube-prometheus-stack
    namespace: monitoring
    overrides:
      alertmanager:
        alertmanagerSpec:
          resources:
            limits:
              cpu: 250m
              memory: 256Mi
            requests:
              cpu: 50m
              memory: 64Mi
      defaultRules:
        create: false
      grafana:
        enabled: false
      prometheus:
        prometheusSpec:
          resources:
            limits:
              cpu: 1
              memory: 1Gi
            requests:
              cpu: 250m
              memory: 512Mi
          retention: 7d
          storageSpec:
            emptyDir:
              medium: ""
              sizeLimit: 5Gi
      prometheusOperator:
        alertmanagerConfigNamespaces:
          - monitoring
        alertmanagerInstanceNamespaces:
          - monitoring
        livenessProbe:
          failureThreshold: 10
          timeoutSeconds: 10
        prometheusInstanceNamespaces:
          - monitoring
        readinessProbe:
          failureThreshold: 6
          timeoutSeconds: 10
        resources:
          limits:
            cpu: 500m
            memory: 512Mi
          requests:
            cpu: 100m
            memory: 256Mi
        thanosRulerInstanceNamespaces:
          - monitoring
    source: https://prometheus-community.github.io/helm-charts
    type: Helm
    valuesFile: components/kube-prometheus-stack/values.yaml
    version: 84.4.0
  - chart: network-operator
    dependencyRefs:
      - nfd
      - cert-manager
    name: network-operator
    namespace: nvidia-network-operator
    source: https://helm.ngc.nvidia.com/nvidia
    type: Helm
    valuesFile: components/network-operator/values.yaml
    version: 26.1.1
  - chart: node-feature-discovery
    name: nfd
    namespace: node-feature-discovery
    source: https://kubernetes-sigs.github.io/node-feature-discovery/charts
    type: Helm
    valuesFile: components/nfd/values.yaml
    version: 0.18.3
  - chart: skyhook-operator
    name: nodewright-operator
    namespace: skyhook
    overrides:
      controllerManager:
        manager:
          resources:
            limits:
              cpu: 500m
              memory: 1Gi
            requests:
              cpu: 250m
              memory: 512Mi
    source: https://helm.ngc.nvidia.com/nvidia/skyhook
    type: Helm
    valuesFile: components/nodewright-operator/values.yaml
    version: v0.15.1
  - chart: nvidia-dra-driver-gpu
    dependencyRefs:
      - gpu-operator
    name: nvidia-dra-driver-gpu
    namespace: nvidia-dra-driver
    overrides:
      nvidiaDriverRoot: /
    source: https://helm.ngc.nvidia.com/nvidia
    type: Helm
    valuesFile: components/nvidia-dra-driver-gpu/values.yaml
    version: 25.12.0
  - chart: nvsentinel
    dependencyRefs:
      - cert-manager
      - gpu-operator
    name: nvsentinel
    namespace: nvsentinel
    overrides:
      platformConnector:
        resources:
          limits:
            cpu: 200m
            memory: 512Mi
          requests:
            cpu: 100m
            memory: 256Mi
    source: oci://ghcr.io/nvidia
    type: Helm
    valuesFile: components/nvsentinel/values.yaml
    version: v1.3.0
  - chart: prometheus-adapter
    dependencyRefs:
      - kube-prometheus-stack
    name: prometheus-adapter
    namespace: monitoring
    source: https://prometheus-community.github.io/helm-charts
    type: Helm
    valuesFile: components/prometheus-adapter/values.yaml
    version: 5.3.0
  - chart: prometheus-operator-crds
    name: prometheus-operator-crds
    namespace: monitoring
    source: https://prometheus-community.github.io/helm-charts
    type: Helm
    valuesFile: components/prometheus-operator-crds/values.yaml
    version: 28.0.1
constraints:
  - name: K8s.server.version
    value: '>= 1.25'
criteria:
  accelerator: a100
  intent: any
  os: any
  platform: any
  service: kind
deploymentOrder:
  - cert-manager
  - nfd
  - network-operator
  - nodewright-operator
  - prometheus-operator-crds
  - kube-prometheus-stack
  - gpu-operator
  - k8s-ephemeral-storage-metrics
  - kai-scheduler
  - nvidia-dra-driver-gpu
  - nvsentinel
  - prometheus-adapter
kind: RecipeResult
metadata:
  appliedOverlays:
    - base
    - monitoring-hpa
    - kind
  version: 0.13.0
validation:
  conformance:
    checks:
      - platform-health
      - gpu-operator-health
      - dra-support
      - accelerator-metrics
- ai-service-metricsNow that you have a recipe, the next step is to turn it into something you can install. aicr bundle converts the recipe into per-component Helm charts, and the generated deploy.sh script installs them in the right order like below:
❯ ls bundles
001-cert-manager			008-gpu-operator-post			deploy.sh
002-nfd					009-k8s-ephemeral-storage-metrics	README.md
003-network-operator			010-kai-scheduler			recipe.yaml
004-nodewright-operator			011-nvidia-dra-driver-gpu		results.json
005-prometheus-operator-crds		012-nvsentinel				undeploy.sh
006-kube-prometheus-stack		013-prometheus-adapter
007-gpu-operator			checksums.txt
The run is honest about what happens along the way. The GPU operator needed one retry while its ClusterPolicy settled, and the script reminds you at the end that some of the work keeps going in the background after it exits:
# turn the recipe into Helm bundles, then deploy
$ aicr bundle --recipe recipe.yaml --deployer helm -o ./bundles
[cli] bundle generated: type=Helm files=57 size=135665 dur=0.016s

$ cd bundles && chmod +x deploy.sh && ./deploy.sh
Pre-flight checks passed.
Installing cert-manager          ... STATUS: deployed
Installing nfd                   ... STATUS: deployed
Installing network-operator      ... STATUS: deployed
Installing gpu-operator          ...
  Error: ClusterPolicy not ready (InProgress); retrying in 5s
  gpu-operator                   ... STATUS: deployed (revision 2)
Installing kai-scheduler         ... STATUS: deployed
Installing nvidia-dra-driver-gpu ... STATUS: deployed
Installing nvsentinel            ... STATUS: deployed
  ... 13 charts total
Deployment complete.

NOTE: Helm install results, not full GPU-workload readiness.
Convergence continues async: node tuning (~10-20 min),
gpu-operator operands, and DRA kubelet plugin registration.The last step is to prove that the cluster actually works. aicr validate with the conformance phase deploys an agent into the aicr-validation namespace to capture a fresh snapshot, runs a readiness check that gates everything else, and then runs five conformance validators chosen from a catalog of eleven. There are other phases as well like inference and training but here we just focus on the conformance part as below:
# prove it: deploy validators into the cluster and check
$ aicr validate --recipe recipe.yaml --phase conformance
[cli] deploying agent: namespace=aicr-validation
[agent] collecting node / GPU / OS / Kubernetes info
[agent] node topology complete: nodes=5 labels=144
[cli] job completed successfully
[cli] readiness pre-flight: constraints=1
[cli] readiness passed: K8s.server.version >= 1.25 (got v1.34.0)
[cli] running phase=conformance catalog=11 selected=5
[cli] validator passed: dra-support
[cli] validator passed: accelerator-metrics
[cli] validator passed: ai-service-metrics
[cli] validator passed: gpu-operator-health
[cli] validator passed: platform-health
[cli] conformance passed: validators=5 passed=5 failed=0 (1m0s)
The report comes out as CTRF JSON, generated by aicr 0.13.0:
{ "reportFormat": "CTRF", "generatedBy": "aicr",
  "tool": { "name": "aicr", "version": "0.13.0" },
  "summary": { "tests": 5, "passed": 5, "failed": 0 } }
None of these checks are a simple lint. The accelerator-metrics check pulled live DCGM metrics for the NVIDIA A100-SXM4-40GB, and the dra-support check allocated a GPU to a test pod, saw the message DRA GPU allocation successful, and then cleaned up after itself. In other words, conformance schedules real GPU work and checks the result.
So the 5/5 is real. It covers a live GPU allocation and real DCGM metrics from the A100. You generated a recipe from the cluster you actually have, deployed it, and proved it before anything real depended on it. That is the difference between reading a matrix and generating one.
You might have noticed that we never ran aicr snapshot anywhere in this walkthrough. That was on purpose, and it is worth explaining why.
First, what is a snapshot? A snapshot is a file that records what your cluster currently has. This includes the nodes, the GPU models on them, the driver and toolkit versions, and the operators that are installed. AICR uses this file as the starting point for everything else. The recipe is resolved against it, and the validator checks against it.
The reason we did not run it as its own step is simple. The two commands we did run, aicr recipe and aicr validate, each take a snapshot on their own before they do their work. So the snapshot still happened. We just did not have to run it by hand.
You can see this in the recipe step. When we ran aicr recipe, the CLI read the cluster first and printed what it found:
[cli] CLI flag overriding snapshot-detected value: field=service detected=any override=kind
[cli] CLI flag overriding snapshot-detected value: field=accelerator detected=any override=a100
Notice the words "snapshot-detected value". AICR looked at the cluster, detected both the service and the accelerator as any, and then our two flags replaced those values with kind and a100. The snapshot was already there. We only changed what it found.
The validate step does the same thing, but it captures a brand new snapshot each time so it is never working from stale information. It deploys a small agent into the aicr-validation namespace, and that agent collects the cluster state right before the checks run:
[cli] deploying agent to capture snapshot
[agent] collecting node topology information
[agent] collecting Kubernetes cluster information
[agent] node topology collection complete: nodes=5 taints=0 labels=144
There is one detail here worth pointing out. The agent runs inside the cluster as a pod, and from inside that pod it could not find nvidia-smi:
[agent] nvidia-smi not found - no GPU data will be collectedSo the snapshot itself did not contain any GPU details, and yet conformance still passed all five checks. That is fine, and it is by design. The snapshot records the nodes and the Kubernetes state. It does not need to see the GPU directly. The proof that the GPU works comes from the validators, which pull live DCGM metrics from the A100 and run a real DRA allocation on it. The snapshot describes the cluster, and the validators test it.
So when would you run aicr snapshot by yourself? You run it when you want the file itself, not just the steps that use it. A few common reasons:
For this walkthrough we did not need any of those, so we let recipe and validate handle the snapshot for us.
The real shift is who does the resolving. A compatibility matrix makes a person hold every constraint by hand. AICR moves that work to a tool that reads the actual cluster, so you review a result instead of working it out yourself. That makes everyday work easier. Adding a new GPU, an A100 now or an H100 next quarter, becomes a flag rather than a research project, and rebuilding a cluster after a driver bump is just generate, deploy, validate. Because the loop ends in a conformance run on real GPU work, you catch a broken stack before a training job does.
You do not even need your own fleet to try it. vind as you saw is a drop-in for kind that can also join a remote node over a secure tunnel. Point it at any GPU you can borrow for an hour, run the four stages, and you have your own conformant GPU stack by this afternoon, resolved from the hardware you actually have and proven before anything depends on it.
With vCluster you can easily run training, inference and other jobs with dynamic capacity in a conformant manner and if you have any questions don’t forget to join our Slack!
Deploy your first virtual cluster today.
