Seamless TLS with vCluster v0.22: Cert-Manager Integration Walkthrough

Jan 17, 2025
|
6
min Read

With the release of vCluster 0.22, managing TLS certificates for virtual clusters has become much easier with the integration of cert-manager. This new built in integration allows you to issue and manage certificates within virtual clusters while leveraging cert-manager running in the host cluster. In this blog post, we’ll take a deep dive into how to enable and use cert-manager integration in vCluster 0.22 with an end-to-end example.
Before we dive in, ensure you have the following:
Tools to Install:
Command:
curl -LO https://github.com/loft-sh/vcluster/releases/latest/download/vcluster-linux-amd64
chmod +x vcluster-linux-amd64
sudo mv vcluster-linux-amd64 /usr/local/bin/vcluster
Command:
kubectl apply -f https://github.com/cert-manager/cert-manager/releases/download/v1.16.2/cert-manager.yaml
Command:
kubectl apply -f https://raw.githubusercontent.com/kubernetes/ingress-nginx/controller-v1.9.4/deploy/static/provider/cloud/deploy.yaml
We will configure a vCluster with cert-manager integration enabled.
Create a vcluster.yaml file:
integrations:
  certManager:
    enabled: true
sync:
  ingresses:
    enabled: true
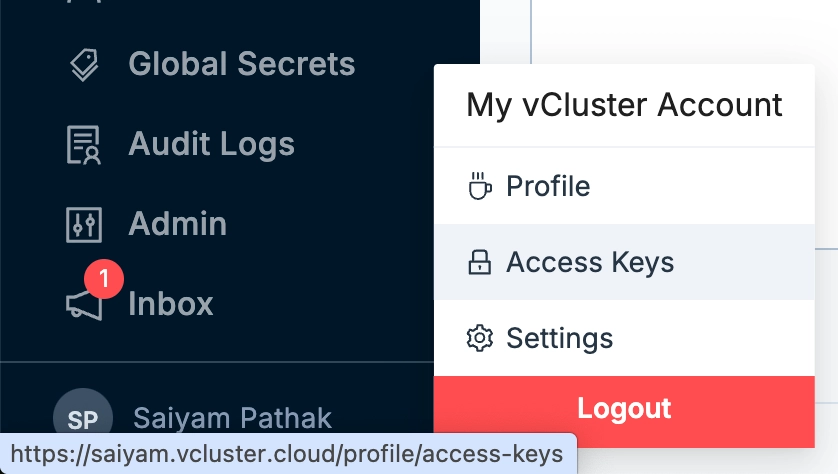
Enable vCluster Pro in order to use this feature: For simplicity, I am using my vcluster.cloud account and then creating the access key to login and enable pro features. In this way I don’t have to run any agent on the current cluster. You can either run vcluster platform start
Or sign up on vCluster cloud and once you login, you should be able to go to access keys and create a short lived access key for the demo (Remember to delete the key post demo for security reasons)
Command:
vcluster platformlogin https://saiyam.vcluster.cloud --access-key <your-access-key>
Output:

Run the following command to create the vCluster:
Command:
vcluster create democert -f vcluster.yaml
Once the vCluster is created, verify it is running:
vcluster list

      NAME   |     NAMESPACE     | STATUS  | VERSION | CONNECTED |  AGE
  -----------+-------------------+---------+---------+-----------+---------
    democert | vcluster-democert | Running | 0.22.1  | True      | 3h3m1s
Export the vCluster kubeconfig: You need to make sure for the next steps to be done, you have switched the context to the virtual cluster.
kubectl config current-context
vcluster_democert_vcluster-democert_do-nyc1-demo
Create an Issuer in the virtual cluster that references cert-manager in the host cluster. With the cert-manager integration, the namespaced Issuers and Certificates are synced from the virtual cluster to the host cluster.
Create a file issuer.yaml with below configuration:
apiVersion: cert-manager.io/v1
kind: Issuer
metadata:
  name: letsencrypt
  namespace: default
spec:
  acme:
    email: saiyam-test@gmail.com
    server: https://acme-v02.api.letsencrypt.org/directory
    privateKeySecretRef:
      name: example-issuer-account-key
    solvers:
    - http01:
        ingress:
          ingressClassName: nginx
Apply the Issuer inside the virtual cluster:
Command:
kubectl apply -f issuer.yaml
Output:
kubectl get issuer
NAME                  READY   AGE
letsencrypt-staging   True    3h34m
Create a file app.yaml:
apiVersion: apps/v1
kind: Deployment
metadata:
  name: nginx
spec:
  replicas: 1
  selector:
    matchLabels:
      app: nginx
  template:
    metadata:
      labels:
        app: nginx
    spec:
      containers:
      - name: nginx
        image: nginx
        ports:
        - containerPort: 80
---
apiVersion: v1
kind: Service
metadata:
  name: nginx
spec:
  selector:
    app: nginx
  ports:
  - protocol: TCP
    port: 80
    targetPort: 80
Apply the file: Apply this on the virtual cluster
kubectl apply -f app.yaml
Output:
kubectl get pod,svc
NAME                         READY   STATUS    RESTARTS   AGE
pod/nginx-7769f8f85b-pmt2n   1/1     Running   0          3h34m
NAME                 TYPE        CLUSTER-IP       EXTERNAL-IP   PORT(S)   AGE
service/kubernetes   ClusterIP   10.245.238.188   <none>        443/TCP   3h35m
service/nginx        ClusterIP   10.245.212.192   <none>        80/TCP    3h34m
Create a file ingress.yaml:
apiVersion: networking.k8s.io/v1
kind: Ingress
metadata:
  name: example-ingress
  namespace: default
  annotations:
    kubernetes.io/ingress.class: nginx
spec:
  ingressClassName: nginx
  tls:
  - hosts:
    - cert.<YOUR-EXTERNAL-IP>.nip.io
    secretName: example-cert-tls
  rules:
  - host: cert.<YOUR-EXTERNAL-IP>.nip.io
    http:
      paths:
      - path: /
        pathType: Prefix
        backend:
          service:
            name: nginx
            port:
              number: 80
In above yaml file, the IP is the external IP of the nginx ingress controller manager running inside the host cluster.
Apply the file: Apply this inside the virtual cluster.
Command:
kubectl apply -f ingress.yaml
Output:
kubectl get ing
NAME              CLASS   HOSTS                       ADDRESS         PORTS     AGE
example-ingress   nginx   cert.24.199.67.197.nip.io   24.199.67.197   80, 443   3h36m
Create a file certificate.yaml:
apiVersion: cert-manager.io/v1
kind: Certificate
metadata:
  name: example-cert
  namespace: default
spec:
  dnsNames:
  - cert.<YOUR-EXTERNAL-IP>.nip.io
  issuerRef:
    name: letsencrypt
    kind: Issuer
  secretName: example-cert-tls
Apply the file: Apply this inside the virtual cluster.
Command:
kubectl apply -f certificate.yaml
Output:
kubectl get certificate
NAME           READY   SECRET             AGE
example-cert   True    example-cert-tls   3h36m
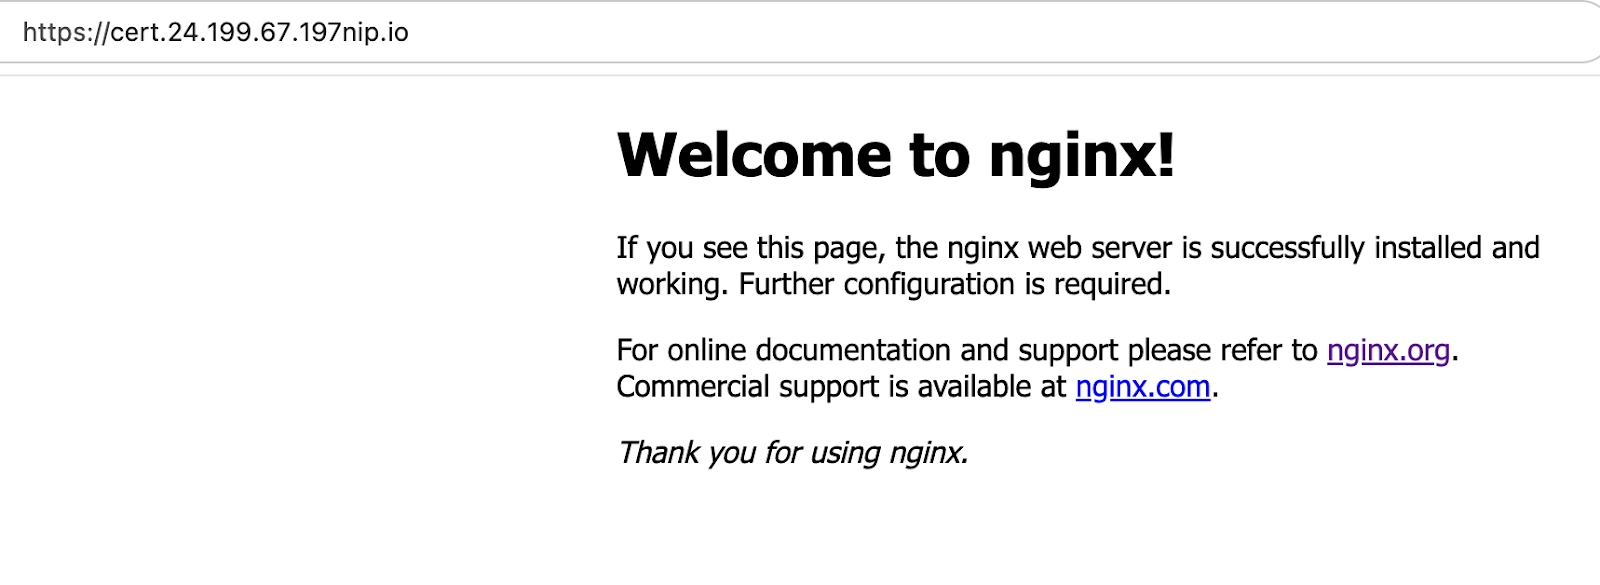
Verify that the https curl command is working as expected
Command:
curl https://cert.24.199.67.197.nip.io
Output:
curl https://cert.24.199.67.197.nip.io
<!DOCTYPE html>
<html>
<head>
<title>Welcome to nginx!</title>
<style>
html { color-scheme: light dark; }
body { width: 35em; margin: 0 auto;
font-family: Tahoma, Verdana, Arial, sans-serif; }
</style>
</head>
<body>
<h1>Welcome to nginx!</h1>
<p>If you see this page, the nginx web server is successfully installed and
working. Further configuration is required.</p>

<p>For online documentation and support please refer to
<a href="http://nginx.org/">nginx.org</a>.<br/>
Commercial support is available at
<a href="http://nginx.com/">nginx.com</a>.</p>

<p><em>Thank you for using nginx.</em></p>
</body>
</html>
vCluster 0.22’s cert-manager integration is a game-changer for managing secure connections in multi-tenant Kubernetes environments. With this guide, you can set up end-to-end TLS for your applications in a virtual cluster while leveraging the power of cert-manager in the host cluster.
Join the vCluster Slack to stay updated!
Deploy your first virtual cluster today.
